Value review comments
Otherwise the initiator has to value the comments made by the reviewer(s), accept or reject all suggested changes and complete the fields in the comment dialog as shown below.
(Don't forget to work in the changes in the reviewed files - but that's not part of QuickRev.)
|
|
|
|
|


-
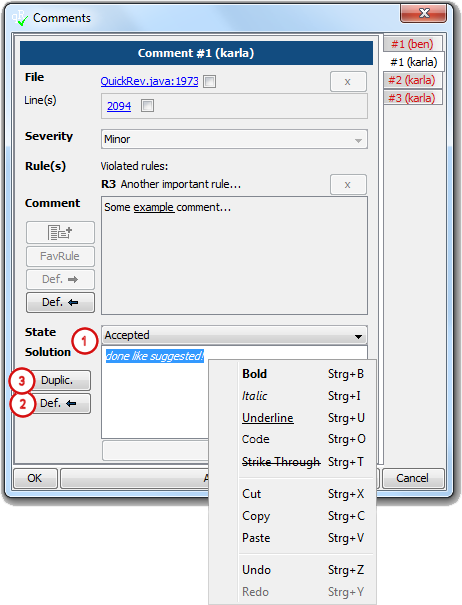
Fill in state and solution
Value the comment by assigning an appropriate state to the comment (AcceptedandRejectedare available by default) and fill in the solution field. The solution text can be formatted via the context menu. If default solutions are available they can be selected via theStatecombo box, so a default solution can be defined and there is no need to write further text.![[See]](images/see.png)
See Default Solutions for creation of default solutions. ![[Configuration]](images/config.png)
Configuration Default values for State can be configured via configuration files. -
Create default solution
Via the Def. <- button the solution described for the comment can be stored as default solution. The button opens the Preferences dialog and copies the Solution to the new created default solution.See Default Solutions for more information. -
Reference duplicated comments
Sometimes different reviewers make the same review comments, so instead of inserting the state and solution for every review comment they can be marked as duplicated. To mark a comment as duplicated use the Duplic. button, which opens the Duplicate Comment Selection dialog, which allows the selection of the comment, this one is duplicated to. Note: to mark a comment as duplicated the comments have to depend to the same review cycle and have to be made from different users. -
Duplicated comment
When a comment is marked as duplicated a link to the comment, this one is duplicated to appears. This link leads to the referenced comment. Furthermore the state and solution of the other comment is shown, but can be modified in the referenced comment only. To remove a reference to a duplicated comment use the x - button.
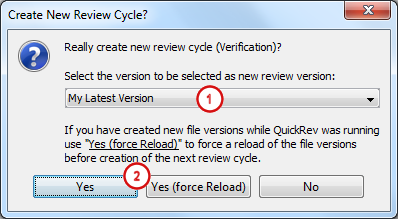
Create new review cycle
To create a new review cycle select menu → . The following dialog will appear.
-
The version selection combo box lets you choose between the following options:
-
My Latest Version
Selects the latest version of every file which corresponds to your user name. This is helpful if other users work on the same files as well and have created new versions on top of your review version in between. If there is no newer version of you the same as the previous selected version will be selected. -
TOP version
Selects to latest known version of all files. -
Same As Current Review Version
Selects the same version as the version selected in the previous review cycle.
-
My Latest Version
-
Use the Yes button to create the new review cycle without reloading the file versions from the version control system, or Yes (force Reload) to reload the history before. The latter is necessary if the corrections have been worked in the review files while QuickRev was running (which should be the normal case).
After creation of the new review cycle a new menu item for the review cycle will be added to the View menu, which allows the selection of the review cycle. Normally these fields do not need to be changed manually by the user since QuickRev will select the relevant review phase and cycle automatically. For more information on this topic see Change Review Phase and Cycle.
Select (follow-up) review versions and add new files

-
Select review version
Select the version with contains the corrections as new Review version. The Base version is the Review version of the former review cycle now. If nothing has changed the Review version remains the same version as the Base version. -
Mark deleted files
If the review leads to deletion of a reviewed file this file has to be marked as deleted via the Deleted button. When marking a file as deleted no Review version can be selected anymore. The Deleted button will change to Un-Delete to undo the deletion.![[Note]](images/note.png)
Note Do not mark moved / renamed files as deleted, use the Moved button instead to specify the new file path. -
Update path of moved / renamed files
If a file has been moved or renamed during the review use the Moved button and select the new path, so the whole history is available again. -
Add new files
If new files have been created based on the review comments add them via the Add File ... button or via the menu item → and select the other file options like described for the creation of the project in chapter Select file references. The same applies to files which have changed based on the review comments, but are not part of the review yet. -
Version selection menus
Make use of the menus Select Base Version and Select Review Version to select the base respectively review version of all files. Note the Sort Files menu does not allow to change the order of files added in previous review cycles, only new added once can be sorted.
Fill in conclusion
| Configuration | ||||
|---|---|---|---|---|---|
The fields on the Conclusion tab can be changed via configuration, so additional fields can be added and the existing once removed.
For more information about this take a look at the configuration chapter.
|
Continue review
Save the project via menu → .
To publish the project use the → menu.
See Send Email Notification for more information about sending and configuring email notifications.
When sending email notifications it is even possible to attach an project and/or exported project without saving it before. This can be useful when
saving the project to some common location, but attaching an export file for reviewers without access to the version control system.
To simplify work you can combine different commands via the menu, so you can e.g. save the project file,
put it under version control and send an email notification in one step. For more information refer to the
Tools
chapter.
![[Tip]](images/tip.png) | Tip |
|---|---|
| Make use of the Input Verification dialog which will show you input fields which are not completed yet. The dialog can be reached via the menu → . For more information see Input Verification dialog. |