Add review comments to text files (source code review)
-
Add comments
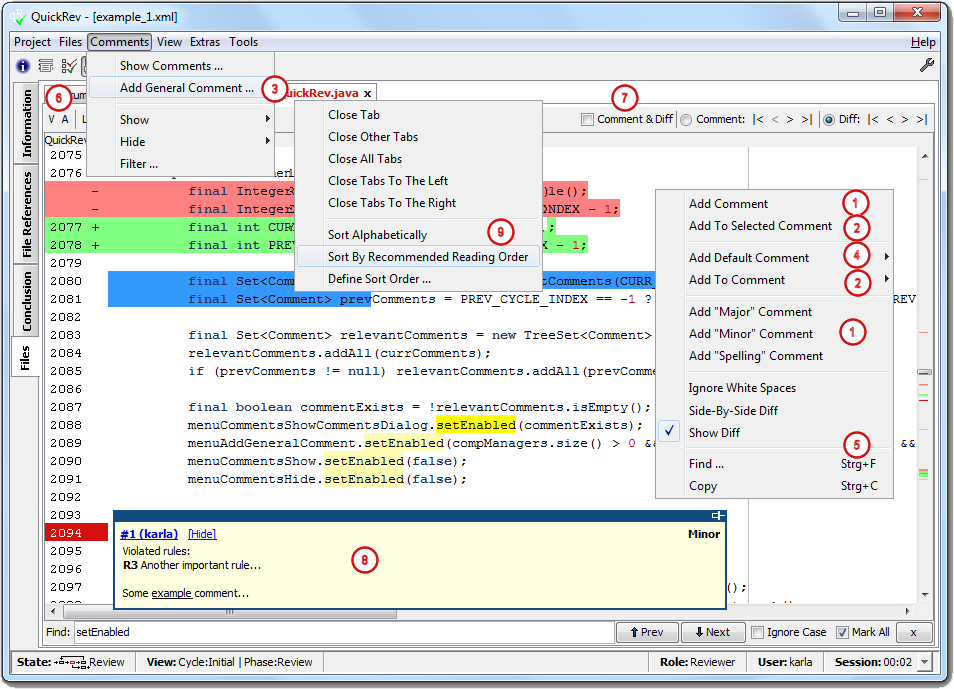
To add a new comment select the lines, where the comment has to be assigned to and open the context menu by right mouse click. Click Add Comment which opens the comment dialog.
Alternatively you can use the menu items Add <severity> Comment to add a comment with the selected severity, so you do not have to select the severity afterwards. Furthermore by using the Add "Spelling" Comment the selected text will be inserted as comment text to be modified afterwards.![[Configuration]](images/config.png)
Configuration Whether the selected text will be inserted as comment text by using the Add <severity> Comment menu items can be configured via config files. ![[Note]](images/note.png)
Note To add comments the selected review phase has to be Review or ALL otherwise the input fields and buttons will be disabled. When opening a project as reviewer Review is selected as default, so normally you don't have to care about this. ![[See]](images/see.png)
See Change Review Phase and Cycle for more information. -
Add file reference to existing comment
If the comment dialog is visible (use menu → ) new references can be assigned to the existing comment by selecting the lines to be added and click Add To Selected Comment from the context menu.
Note: A reviewer can only assign new file references to its own comments.
To add file references to existing comments without opening the Comments dialog and selecting the appropriate comment before, a comment can be added to the Add To Comment menu item of the context menu. So the comment, where the file references have to be added to, can be selected easily from the Add To Comment menu. For more information about this topic take a look at the Comments dialog description following on this page. -
Add a general comment
To add a general comment which does not depend to a special file use the → menu.
Alternatively you can add a comment via the context menu as described above and remove the file reference from the Comments dialog.
To add a comment to all lines of a file add a comment and remove the selected lines from the Comments dialog, so the comment applies to the entire file. -
Add default comment
Comments can be predefined via the Preferences dialog or created out of existing comments from the Comments dialog. This comments will be shown in the Add Default Comment menu and can be selected easily here. Please take a look at the Comments dialog description following at this page for more information about creation of default comments from existing once. -
View options
Click Ignore White Spaces to hide the changes concerning white spaces.
To see the differences between different versions side by side select Side-By-Side Diff (only available if Delta Review is selected). The default for these settings can be changed in the Preferences dialog.
Sometimes too many changes can lead to loose of an overview, so you can hide the diff and show just the file to be reviewed by selecting / de-selecting the Show Diff menu.
Find ... opens the text field on the bottom of QuickRev to search inside the review window.
Copy copies the selected code into the clipboard. -
Show author and / or version number
Make use of the A-uthor and V-ersion buttons to show the author respectively version of every individual line in the file (file annotations). -
Navigation bar
Use the navigation bar to jump easily between comments of differences in a file. -
Comment Tool Tip
Assigned comments will be marked at the line numbers the comment is assigned to. By moving the mouse over these comment markers the shown Comment Tool Tip appears which allows the selection of the comment in the Comments dialog or to hide the comment via the [Hide] link. Furthermore you can pin the Comment Tool Tip via the button at the top right corner, so the tool tip will appear at the same location always. -
Sort files
Make use of the context menu of the file tabs to sort them by the order the initiator has defined (Sort By Recommended Reading order), alphabetically or make use of the Sort Files dialog via the Define Sort Order ... menu item. Furthermore the tabs can be moved per drag & drop.See menu Sort ... for more information about the Sort Files dialog.
Add review comments to non-text files
-
Show comments
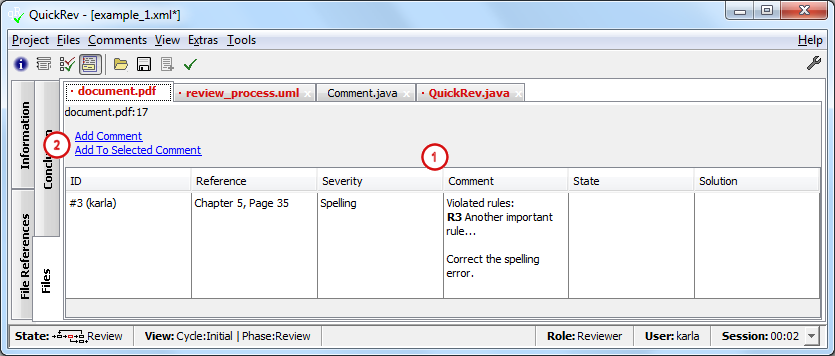
Sincenon-textfiles will not be displayed in QuickRev (unless a corresponding plug-in allows this) the review comments will be shown in a table and the reference within the file the comment is assigned to has to be made textually (no line numbers). -
Add comments
Make use of the Add Comment link to add a new comment and use the Add To Selected Comment link to add the file as reference to the comment currently selected in the Comments dialog.
Add review comments to UML files
| Note |
|---|---|
| To view UML files a corresponding plug-in has to be written to convert the file format of the uml file to the QuickRev uml-model. See Plug-Ins for more information. |

-
Add comments
Adding comments the UML elements is similar to adding comments to text files. Select an element, the comment has to be added to and use the appropriate menu item of the context menu. For a description of the context menu items take a look at the text file comments described above. -
Comment Tool Tip
Elements with assigned comments will be marked in a different color. By moving the mouse over these comment markers the shown Comment Tool Tip appears which allows the selection of the comment in the Comments dialog or to hide the comment via the [Hide] link. Furthermore you can pin the Comment Tool Tip via the button at the top right corner, so the tool tip will appear at the same location always. -
Comments overview
For an overview of all comments added to an uml file switch to the Table View.
The Comments dialog
|
|
|
|
|
-
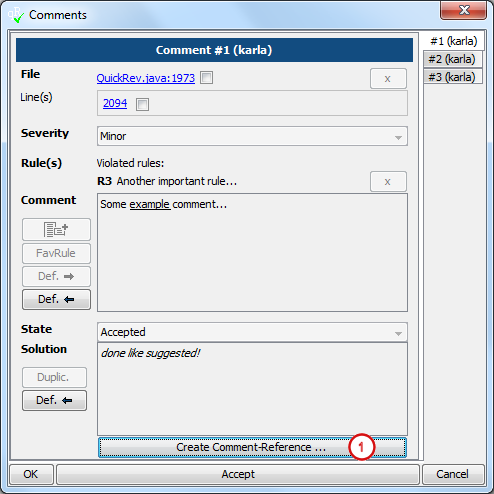
Select severity and insert comment text
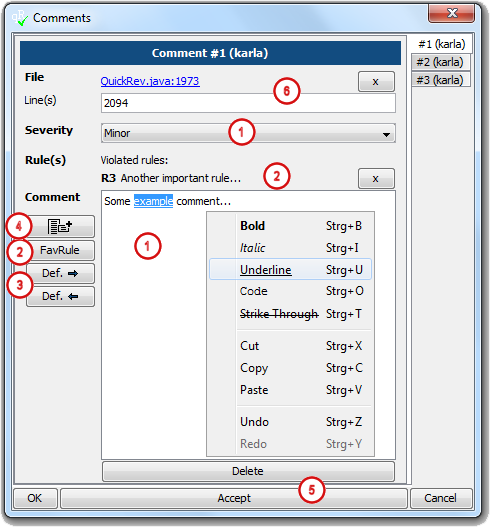
After creation of a new comment select the Severity and insert the Comment. The comment text can be formatted via the context menu (right mouse click).Configuration Default values for Severity can be configured via configuration files. -
Add checklist rules
If the comment you made is associated with a violated rule from a checklist this rule can be added to the comment. Adding a rule can be done via the Checklist dialog. See Checklists for more information. If rules are marked as favourite rules in the Checklist dialog they can be selected easily via the FavRule button, which brings up a dialog which lists all favourite rules to be selected easily.
Multiple rules can be assigned to one comment.
To remove a rule use the x-button.
Note: if a rule is added to a comment it is not necessary to add additional text, since the rule should be expressive enough for itself. -
Default comments
Via the Def. -> button you can copy the content of a default comment to this comment. Using this button will bring up a dialog with all default comments to be selected easily.
To create a default comment based on the current comment use the Def. <- button. Clicking this button opens the Default Comments tab from the Preferences dialog and adds a new default comment with the content of the current one. For more information about default comments take a look at the Default Comments chapter. -
Add comment to Add To Comment context menu
This button adds the selected comment to the Add To Comment menu of the context menu in the code window, so new file references can be added to this comment easily by just selecting this comment from the context menu instead of opening the Comments dialog explicitly and selecting the comment before. Take a look at the Add review comments to text files (source code review) chapter above for an example. -
Accept comments
Click Accept to accept the changes without closing the dialog, OK to accept and close the comment dialog and Cancel to discard all changes and close the comment dialog. The Delete button deletes the selected comment. -
File references (text - files)
The file references are shown at the top of this dialog. Use the link to open the references file. After the review phase is finished the line numbers will be become links as well to jump to the lines. During the review phase the line numbers can be changed in the text field easily. If the comment references the whole file (all lines) you can clear the line numbers field by removing all line numbers.
To remove a file reference use the x button. When removing all file references the comment does not depend to a special file anymore. This is the same like adding a general comment by using the menu → . -
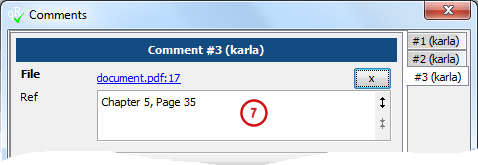
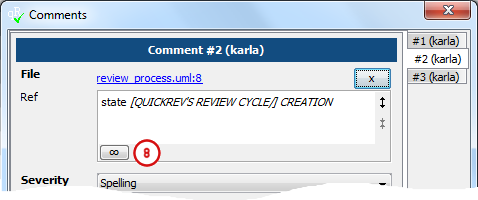
File references (non-text - files)
When assigning file references to non-text files no line numbers can be given. Instead the reference in the document has to be described in the Ref field. The text can be formatted via the context menu. -
File references (qr:uml - files)
Additional to the text reference as given for the non-text files a data-link will be assigned to comments for uml-files. So a textual description exists which is available in the project files and additional the id of the corresponding uml-element is referenced via the data-link to show the comment at the specific uml-element. By clicking the data-link button the reference will be removed.Note To view UML files a corresponding plug-in has to be written to convert the file format of the uml file to the QuickRev uml-model. See Plug-Ins for more information.
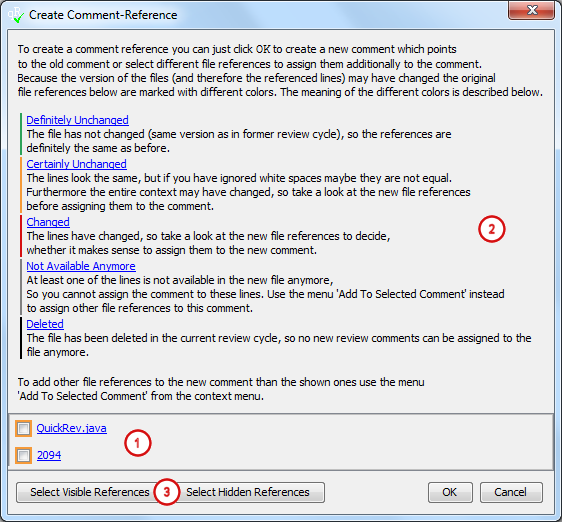
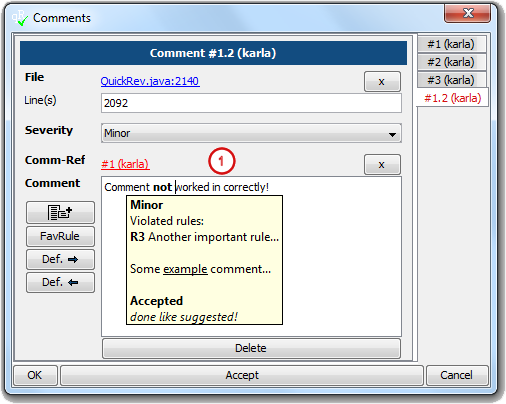
Assign comments to comments (follow-up review cycle)
After a review cycle is completed the reviewers have to verify whether their comments have been worked in correctly.
If this is not the case it is possible to create a new comment which references the original one and add some
additional comment text. Furthermore new file references can be added to this comment.
Note: this feature is available only in a follow-up review cycle.
|
|
|
|
|
|
|
|
|
Fill in conclusion

-
Finally fill in the input fields at the Conclusion tab for the reviewer.
Configuration The fields on the Conclusion tab can be changed via configuration, so additional fields can be added and the existing once removed. For more information about this take a look at the configuration chapter. -
If all reviewers have finished their review the review state changes to Correction.
Save and publish project
To publish the project use the → menu.
See Send Email Notification for more information about sending and configuring email notifications.
When sending email notifications it is even possible to attach an project and/or exported project without saving it before. This can be useful when
saving the project to some common location, but attaching an export file for reviewers without access to the version control system.
To simplify work you can combine different commands via the menu, so you can e.g. save the project file,
put it under version control and send an email notification in one step. For more information refer to the
Tools
chapter.
![[Tip]](images/tip.png) | Tip |
|---|---|
| Make use of the Input Verification dialog which will show you input fields which are not completed yet. The dialog can be reached via the menu → . For more information see Input Verification dialog. |